BlogLovin

Popular Posts
-
 This Memorial Day weekend, my family honored my cousin by having the road my Grandmother, Aunt and Uncle and his family live on renamed fo...
 -
 I'm lonely. No matter where I am or who I'm with - both in a given moment or in the larger scheme of life - I can be lonely. And you...
 -
 I'm in the process of reading Fraternity by Diane Brady. I find the subject matter largely uninteresting - the book relays College of ...
 -
In 1961 District Judge Harold Cox was appointed to the U.S. District Court for the Southern District of Mississippi. He was known as a raci...
-
 When I began reading Three Cups of Tea , I made a prediction that I’d either love the book because it was about a man, Greg Mortenson, foun...
 -
Today, I finished reading Evita: In My Own Words , an autobiography of Eva Perón, former First Lady of Argentina . And while I loved its i...
-
I've been thinking, we need to give our parents' generation much more credit. For instance, the frustration we feel when trying to ...
-
 I'm sitting here thinking about all the stuff I planned for this weekend to try to squeeze every drop of fun out of summer before its...
 -
Since I've entered my end of the semester crunch time, I've been on the train at all hours of the night trying to get home from scho...
-
 Sometimes the easist way to define something is to list every thing it's not. So here goes. Having just entered my 32nd year of life,...

Showing posts with label Crafts. Show all posts
Checking In
Life is truly funny. A couple of years ago, I revived this blog because I was in a life-defining moment and needed a space to sort through my thoughts. Recently, I've entered another one of those moments - just really needing some change in my life and embracing the fact that the only way I can bring that about is by making bigger, more directed strides toward my goals. And even though I'm still working through my thoughts through endless writing, this time around I'm being selfish and only writing for myself. I'm working on a piece that's different from anything I've every written because not only is it very personal, but I'm also tying it into a well-known, spiritual concept. I'm not sure what I plan to do with it once it's finished, so I don't want to spill anymore beans; just wanted to let you all know why I haven't been around.
Anyway, beyond writing, I've also been in my creative space in other ways. I finished my skirt just in time to start refreshing my fall, work wardrobe!

Here are the steps it took me to get there:

Preparing the lining's hem. Using the gauge to make sure the lining is folded an inch and a half all the way around. Got to make sure it's not hanging beyond the hem of the skirt!

Preparing the skirt's hem. This time, I used the gauge to make sure the skirt's hem is folded at 5/8ths of an inch. It came in right under the skirt's lining.

Sewing the skirt's hem at 3/8ths of an inch.
 |
| Preparing the hook and eye closure for the waistband right above the zipper. |

All finished!
And just because it's been such a long time since I started this project, here's the YouTube link to the first of four Mimi G lessons that got me through reading the pattern for this skirt. You should be able to find the rest of the videos using YouTube's sidebar. And, I'm sure a fabric store would have the physical pattern, but I didn't want to risk the not having it, so I ordered mine on Amazon.
Also, I finally made it to one of those sip and paint classes that are so popular in the DC area (I took mine via a Groupon at Visarts Studio - beautiful facility btw). Here's the end result.

Well, I know that was a lot, so until next time,
~ With ♥ from Halima
Tag :
Crafts
,
Pardon the Birthday Interruption
This past weekend was my birthday weekend. So, I didn't get to make the post I was planning, but I did get to speak and spend time with so many loved ones, I'm still on cloud 9.
I promise I'll have the other post within the next two weeks. But even with all the celebrating, did get a chance to work on my skirt, so I'll just give an update on that.
I found out the interface material I talked about in my last post was sew-in and Mimi G called for a iron fusible. So, I had to make another trip to the fabric store, for a different kind of interfacing. Luckily this trip didn't take three hours lol
I sewed the panels of the skirt together with no problem.

And although I was a little intimidated by inserting the zipper, I did okay.

I started piecing together the lining too. The pattern didn't call for this step, but this is something Mimi G added to the project. I think it's a good idea to give the skirt a more finished look, plus it's great experience.

So I guess that's about it. Check out my Facebook page for updates on my upcoming craft room project.
Until next time,
~With ♥ from Halima


I promise I'll have the other post within the next two weeks. But even with all the celebrating, did get a chance to work on my skirt, so I'll just give an update on that.
I found out the interface material I talked about in my last post was sew-in and Mimi G called for a iron fusible. So, I had to make another trip to the fabric store, for a different kind of interfacing. Luckily this trip didn't take three hours lol
I sewed the panels of the skirt together with no problem.
And although I was a little intimidated by inserting the zipper, I did okay.
I started piecing together the lining too. The pattern didn't call for this step, but this is something Mimi G added to the project. I think it's a good idea to give the skirt a more finished look, plus it's great experience.
So I guess that's about it. Check out my Facebook page for updates on my upcoming craft room project.
Until next time,
~With ♥ from Halima
Tag :
Crafts
,
Halima's Faves
,
I Started Sewing My First Skirt!!
If we're friends on Facebook, you may have already seen that not only did I receive the replacement needle threader for my sewing machine this week, but my Mom also gave me a six foot table as a workstation. Something like a fresh start. But it killed any excuse I had to start on my biggest project yet - a skirt.
I'll admit it, I'm a little intimidated by the thought of making something so large. I mean, if I put so much effort into something and it doesn't come out as something I'll actually feel proud wearing, I don't want it to frustrate me and keep my from wanting to learn anything else about sewing.
But I digress.
Here's my first look at an actual, clothing pattern:

Anyway, after watching Mimi G's third lesson and learning all about the importance of the grain of fabric for draping purposes, I figured out the right way to position the pattern on the fabric:
 |
| If you look closely, you can spot Nellie standing patiently by in hopes of getting her mouth on any stray thread. I swear, that dog will try to eat anything!! |
So lesson learned this week?? I will be taking Mimi's suggestion of using washers to weight the pattern down while cutting the fabric instead of using pins. I've just found that unless I use a lot of pins, the pattern moves and my cutting becomes jagged. And using a lot of pins creates a lot of holes in the pattern; if I decide to make this skirt again (maybe in a different color and/or fabric), I don't want the pattern to be all torn up and hard to work with.
And finally, one of the benefits of this skirt is that it will teach me the basics of working with interface. This is a material you bond to certain areas of your fabric to give your garment some structure. Like, some men's shirts have it in the collar to make them stand up. I think the purpose of it in this project - because it will be placed in the waistband where the shape of the garment is being determined - is to make sure the skirt falls away from the body real pretty like.
So anyway, this is me preparing to cut the interfacing to match the waistband I had just cut:

Tag :
Crafts
,
Halima's Faves
,
I'm What's Happening Lite: My Sewing Machine Caddy
My inaugural 'What's Happening' the Lite version! I intended it to be more of a update on longer projects, but my second sewing project ended up being pretty quick. It works out for you because, you know, instant gratification - you get to see progress pictures and my finished product all in one post.
So, despite my love of crafting, I don't have a dedicated workspace (something I plan on fixing in the next year or so). If you don't already know, learning a new craft is rewarding, but also frustrating. And an unorganized work area only adds to that frustration. So until I can get my crafting room set up, I decided a sewing machine caddy would be a good idea - keeps everything in one place, close by, but also out of the way. I found this pattern on Craftsy and picked up the supplies during my three hour trip to the fabric store.
 |
| The first step was actually my least favorite part of sewing so far, the cutting. Even with a cutting board, I've managed to cut jagged edges. This fabric was easier to work with then the stretch fabric I worked with on my first project, the vintage headband. I did cut pretty straight lines, this time, but it took a long time. And I discovered that even though batting looks like a bag full of clouds, it's actually a pain to cut, largely because of its stretchy factor. If anyone has any tips on working with this, please share. |
 |
| After cutting, I had to iron the pocket. This step got rid of the deep, folding crease that was in the material, but also created a crisp pocket. |
 |
| Next, I arranged the layers of the caddy: batting, back piece of fabric, pocket and front piece of fabric. It was an interesting order, but because the project is worked inside out, it all worked out. |
 |
| Finally got to the sewing part. I pinned the layers together to ensure I sewed through all the layers. The pattern called for me to sew up the two sides and the bottom. I was a little hesitant about sewing around corners because I've never done it and after my "cut on the fold" incident, I figured better to ask the dumb question than to make another mistake, especially because I didn't have extra fabric this time. So, I watched this YouTube tutorial for sewing corners. Very straightforward without making you feel like you asked the dumb question lol |
 |
| This was after I sewed up the sides and bottom and flipped the caddy right side out. |
 |
| And, after I sewed partitions into the pocket to make four pockets. I have my fabric marker, seam ripper, fabric scissors, tape measure and straight pins stored with plenty of room leftover!
The whole project only took about two hours which I didn't think was bad considering a broken automatic needle threader and about 20 minutes spent fighting with the bobbin.
Until next time....
~With ♥ from Halima
|
Tag :
Crafts
,
Halima's Faves
,
Photography Aspirations: My Latest Money Shots
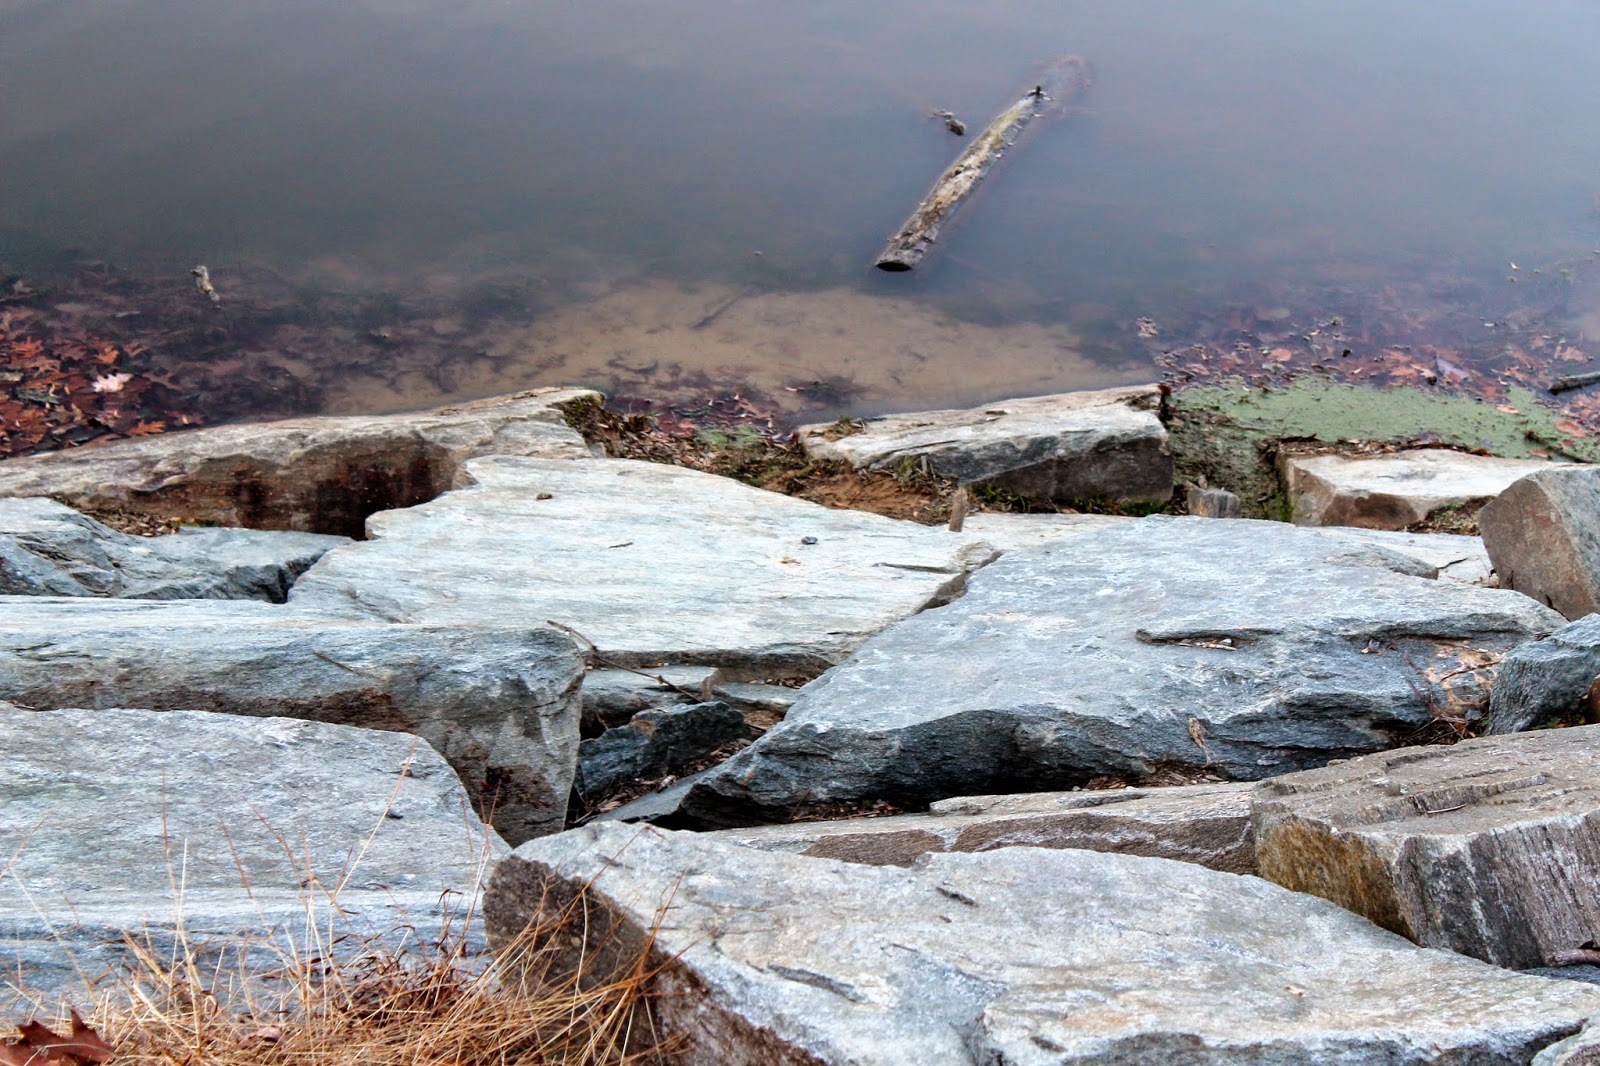
So, a couple of weeks ago I decided to visit my regional park to do some thinking. Just for kicks, I grabbed my camera making this the first time I've picked it up for the first real time in over a year.
But afterwards I finally decided to stop being intimidated by photo editing software, went through and edited a good amount of photos and had some of my coworkers, who just so happen to be professional photographers, critique my work. I promise I tried to stop bothering these guys by taking one of those photography classes that pops up in my Groupon feed, but somehow I had my zip code messed up in my profile and kept getting offers for a city two hours away. So yea, I guess it pays to be in the communication field and know people.
Anyway, through group consensus, it was decided these are my money shots.


And just for good measure, my roll dog, Nellie got dragged on the trip so she deserves honorable mention. This is her looking for the next squirrel to chase.

I was sick last week, but I'm going to do my best to post again this week. If I don't get around to it though, have a very Merry Christmas.
~With ♥ from Halima
Tag :
Crafts
,
Halima's Faves
,
Now on Bloglovin'
Follow my blog with Bloglovin
After doing my usual procrastination, I've finally gotten around to signing up for Bloglovin'!! Please show me some love and follow me by clicking the above link or the button below.
~ With ♥ from Halima
After doing my usual procrastination, I've finally gotten around to signing up for Bloglovin'!! Please show me some love and follow me by clicking the above link or the button below.
~ With ♥ from Halima
Tag :
Crafts
,
My Latest Thing, Doll Clothes
I get more junk mail than a little bit, but the other day when I was clearing out my gmail inbox, something caught my eye - an email promoting a book of patterns for 18 inch dolls (think American Girl size). Somehow this just seemed right; quick, cute projects to relieve stress.
I quickly set about trying to find a brown skinned doll with natural hair. When I say quickly, I actually mean this took all day because that combination is damned near impossible to find. But, I finally found a beauty on eBay, won her during the auction and purchased the pattern book.
Because the doll would be arriving with no clothes, I thought it was the least I could do to have some waiting. I went online, found a free pattern for a jumper, made it and came out with this:
Lucky for you all, I've just launched two pages on this here blog
to provide some of my favorite books and craft projects. So I'm saying all of
that to say, you can find a link to the jumper pattern on my new crafts page. You're welcome and enjoy :-)
Until next time...
~ With ♥ from Halima
P.S. Still looking for a name for my doll
clothes model. Suggestions are most definitely welcome. Please leave them in my comments section.
Tag :
Crafts
,
Halima's Faves
,
A Crocheted Christmas Part 3
I pulled it off and managed to finish one more crochet project this season!! Sorry my limited photography skills don't do these justice, but they're red, gold and green bell door hangers. I made a set for the front door and another set for the back door. I even managed to find some jingle bells online, so when the doors open, there's the cutest, little tinkling sound.

We'll see how long these last with Giselle around *laughter* she's really into all the decorations and loves anything with a bell.

And because that photo wasn't the most flattering, a cute Giselle pic for the masses.

Well, this is the final post in my Crocheted Christmas series. I am working on another crochet project, but I'm pretty sure it won't be done in time for Christmas. Seems like everybody liked the series (A Crocheted Christmas and A Crocheted Christmas Part 2), so I'll try to remember to do it again next year.
Until next time, ♥ from Halima
Tag :
Crafts
,
Halima's Faves
,
A Crocheted Christmas Part 2
As promised in my last post A Crocheted Christmas, here's a photo of the placemats I crocheted. Sparkly, sparkly.
I'll try to post more photos of this season's projects, but most are presents, so I don't want to spoil any surprises.
Until next time,
♥ from Halima

Tag :
Crafts
,
Halima's Faves
,
A Crocheted Christmas
I haven't been posting much because I've been getting ready for the holidays. Just finished crocheting this Christmas throw for my living room. Loved working with this yarn because if you look closely, it has sparkles. I love anything sparkly.
I'm working on placemats too, so next time I'll share a photo of those.

Tag :
Crafts
,
Halima's Faves
,

