BlogLovin

Popular Posts
-
 This Memorial Day weekend, my family honored my cousin by having the road my Grandmother, Aunt and Uncle and his family live on renamed fo...
 -
 When I began reading Three Cups of Tea , I made a prediction that I’d either love the book because it was about a man, Greg Mortenson, foun...
 -
 I'm lonely. No matter where I am or who I'm with - both in a given moment or in the larger scheme of life - I can be lonely. And you...
 -
 I'm in the process of reading Fraternity by Diane Brady. I find the subject matter largely uninteresting - the book relays College of ...
 -
I've been thinking, we need to give our parents' generation much more credit. For instance, the frustration we feel when trying to ...
-
 You know how sometimes you can be so used to something, you don't even think about its meaning, until you do then you have your aha mo...
 -
The past couple of weeks I've been bouncing between feeling like everything's on the brink of coming together for me and feeling lik...
-
 It's not #tbt yet? No? Oh well lol Mom and Me, Christmas in the '80s Over the weekend, my friend and I were talking about how n...
 -
Today, I finished reading Evita: In My Own Words , an autobiography of Eva Perón, former First Lady of Argentina . And while I loved its i...
-
In 1961 District Judge Harold Cox was appointed to the U.S. District Court for the Southern District of Mississippi. He was known as a raci...

Archive for April 2015
Halima Wuz Here

So, imagine my surprise when as a little girl sitting at my Grandaddy's feet as he put socks on, I realized my feet looked just like his. And let me tell you, my Grandaddy had some strong genes because just about everyone in my family has this man's hands and feet lol
Fast forward some years to when as a young adult and I began wondering what mark I would leave on this world. Up until about four years ago if you'd asked me what it would be, I would have told you I wanted to write something beautiful that would inspire and be quoted by many people. Now, that would still be nice, but I've really started to understand the importance of family.
So, maybe my mark will simply be having a grandchild look back and remember me crawling around on the floor with them (Mema) or being told to "shake a tailfeather or say good morning, one" (Grandaddy). And you know what, that's more than okay because in my opinion, that's what this life is all about. If I can touch at least one person to the point where my memory lives on through them, then I did something right.
The slideshow has music, so make sure your sound is up :-)
Oh yea, and for what it's worth, this is the post I promised a couple of weeks back. I had to put the slideshow of my grandparents together, so I hope you all enjoyed and that it was worth the wait.
Until next time...
~ With ♥ from Halima
Tag :
free think
,
Book Review: The Red Tent

When I was on the verge of womanhood, I would read and re-read Proverbs 31 trying to ingrain the traits of being the ideal woman. The summary to the left is bare bones and doesn't grasp how amazeballs "ideal" is, so check out the full text if you have a moment. But let's just say, if she existed, she'd be that mom every other mom hated because her life was so daymn perfect lol. She could do it all and she had it all.
Needless to say, I'd walk away from this text amazed, but also feeling defeated because let's be honest, nobody can ever achieve all of that. And if it looks like someone is, something is probably way off balance in parts of their life that aren't visible.
To make matters worse, Christianity doesn't provide any in depth examples of the inner lives of women, let alone those of the ideal woman .
And that's why I loved reading The Red Tent. The author, Anita Diamant, spun an entire story about the women mentioned in passing in the Bible and has Dinah, the daughter of Jacob, as narrator. So kind of like biblical history told from a female point of view, but more character driven.
Initially, I thought it was a cool concept, made for a great read and so I was just going to add it to my recommended reading page. But then I started thinking about what Diamant really did with this book. It wasn't preachy, but it showed Dinah and her mother figures encompassing the virtues of ideal, but very real and imperfect women. Much like myself. I may not get it all or any of it right at any given time, but I try. I try to be responsible and do that right thing when necessary, but sometimes I just want pure enjoyment. I honor my family most times, but when it's time to set boundaries for my own well-being, I do that too. But maybe most importantly, I try to keep faith. Sometimes I falter and that's okay because everything will work out.
The last thing I'll leave you with is that this book truly celebrates womanhood. From our hopes, dreams, strengths, weaknesses, pain, happiness, ritual, loving, wisdom, everything that makes us women, it just made me want to walk up to every lady I saw and fist bump them lol We are awesome! Read this book, ladies and then buy a copy for your mom and your best friend so we all can bask in our sisterhood :-)
~ With ♥ from Halima
Tag :
Book Reviews
,
Pardon the Birthday Interruption
This past weekend was my birthday weekend. So, I didn't get to make the post I was planning, but I did get to speak and spend time with so many loved ones, I'm still on cloud 9.
I promise I'll have the other post within the next two weeks. But even with all the celebrating, did get a chance to work on my skirt, so I'll just give an update on that.
I found out the interface material I talked about in my last post was sew-in and Mimi G called for a iron fusible. So, I had to make another trip to the fabric store, for a different kind of interfacing. Luckily this trip didn't take three hours lol
I sewed the panels of the skirt together with no problem.

And although I was a little intimidated by inserting the zipper, I did okay.

I started piecing together the lining too. The pattern didn't call for this step, but this is something Mimi G added to the project. I think it's a good idea to give the skirt a more finished look, plus it's great experience.

So I guess that's about it. Check out my Facebook page for updates on my upcoming craft room project.
Until next time,
~With ♥ from Halima


I promise I'll have the other post within the next two weeks. But even with all the celebrating, did get a chance to work on my skirt, so I'll just give an update on that.
I found out the interface material I talked about in my last post was sew-in and Mimi G called for a iron fusible. So, I had to make another trip to the fabric store, for a different kind of interfacing. Luckily this trip didn't take three hours lol
I sewed the panels of the skirt together with no problem.
And although I was a little intimidated by inserting the zipper, I did okay.
I started piecing together the lining too. The pattern didn't call for this step, but this is something Mimi G added to the project. I think it's a good idea to give the skirt a more finished look, plus it's great experience.
So I guess that's about it. Check out my Facebook page for updates on my upcoming craft room project.
Until next time,
~With ♥ from Halima
Tag :
Crafts
,
Halima's Faves
,
I Started Sewing My First Skirt!!
If we're friends on Facebook, you may have already seen that not only did I receive the replacement needle threader for my sewing machine this week, but my Mom also gave me a six foot table as a workstation. Something like a fresh start. But it killed any excuse I had to start on my biggest project yet - a skirt.
I'll admit it, I'm a little intimidated by the thought of making something so large. I mean, if I put so much effort into something and it doesn't come out as something I'll actually feel proud wearing, I don't want it to frustrate me and keep my from wanting to learn anything else about sewing.
But I digress.
Here's my first look at an actual, clothing pattern:

Anyway, after watching Mimi G's third lesson and learning all about the importance of the grain of fabric for draping purposes, I figured out the right way to position the pattern on the fabric:
 |
| If you look closely, you can spot Nellie standing patiently by in hopes of getting her mouth on any stray thread. I swear, that dog will try to eat anything!! |
So lesson learned this week?? I will be taking Mimi's suggestion of using washers to weight the pattern down while cutting the fabric instead of using pins. I've just found that unless I use a lot of pins, the pattern moves and my cutting becomes jagged. And using a lot of pins creates a lot of holes in the pattern; if I decide to make this skirt again (maybe in a different color and/or fabric), I don't want the pattern to be all torn up and hard to work with.
And finally, one of the benefits of this skirt is that it will teach me the basics of working with interface. This is a material you bond to certain areas of your fabric to give your garment some structure. Like, some men's shirts have it in the collar to make them stand up. I think the purpose of it in this project - because it will be placed in the waistband where the shape of the garment is being determined - is to make sure the skirt falls away from the body real pretty like.
So anyway, this is me preparing to cut the interfacing to match the waistband I had just cut:

Tag :
Crafts
,
Halima's Faves
,
I'm What's Happening Lite: My Sewing Machine Caddy
My inaugural 'What's Happening' the Lite version! I intended it to be more of a update on longer projects, but my second sewing project ended up being pretty quick. It works out for you because, you know, instant gratification - you get to see progress pictures and my finished product all in one post.
So, despite my love of crafting, I don't have a dedicated workspace (something I plan on fixing in the next year or so). If you don't already know, learning a new craft is rewarding, but also frustrating. And an unorganized work area only adds to that frustration. So until I can get my crafting room set up, I decided a sewing machine caddy would be a good idea - keeps everything in one place, close by, but also out of the way. I found this pattern on Craftsy and picked up the supplies during my three hour trip to the fabric store.
 |
| The first step was actually my least favorite part of sewing so far, the cutting. Even with a cutting board, I've managed to cut jagged edges. This fabric was easier to work with then the stretch fabric I worked with on my first project, the vintage headband. I did cut pretty straight lines, this time, but it took a long time. And I discovered that even though batting looks like a bag full of clouds, it's actually a pain to cut, largely because of its stretchy factor. If anyone has any tips on working with this, please share. |
 |
| After cutting, I had to iron the pocket. This step got rid of the deep, folding crease that was in the material, but also created a crisp pocket. |
 |
| Next, I arranged the layers of the caddy: batting, back piece of fabric, pocket and front piece of fabric. It was an interesting order, but because the project is worked inside out, it all worked out. |
 |
| Finally got to the sewing part. I pinned the layers together to ensure I sewed through all the layers. The pattern called for me to sew up the two sides and the bottom. I was a little hesitant about sewing around corners because I've never done it and after my "cut on the fold" incident, I figured better to ask the dumb question than to make another mistake, especially because I didn't have extra fabric this time. So, I watched this YouTube tutorial for sewing corners. Very straightforward without making you feel like you asked the dumb question lol |
 |
| This was after I sewed up the sides and bottom and flipped the caddy right side out. |
 |
| And, after I sewed partitions into the pocket to make four pockets. I have my fabric marker, seam ripper, fabric scissors, tape measure and straight pins stored with plenty of room leftover!
The whole project only took about two hours which I didn't think was bad considering a broken automatic needle threader and about 20 minutes spent fighting with the bobbin.
Until next time....
~With ♥ from Halima
|
Tag :
Crafts
,
Halima's Faves
,
I'm What's Happening: April 2015
Sooo...this past month I really dove into my pursuit to learn how to sew.
I found a couple of basic patterns on Craftsy and also took the suggestion of a friend and checked out Mimi G. I was really excited about her because she has free, online classes which walk you through patterns.
This led me to my first trip to the fabric store. Where I spent three hours. In my defense, not only did I have no idea what I was doing, but I had to touch all the gadgets I never knew existed.
The first project I decided to try was a vintage headband. Simple, right?? Just sewing in straight lines. The first night I worked on it things moved slowly, but I walked away feeling confident I could pick this craft up in no time. I printed and cut the pattern and fabric. Then I created the main seams. Sat back to admire my handiwork and noticed the pieces looked a little shorter than the pattern's picture, but thought maybe it was the angle from which the photo was taken. Or maybe because there were two pieces that needed to be put together, the length would work itself out.
The second night started off bad. I sat down with all the confidence in the world, thinking all I had to do was spend a couple of minutes putting the finishing touches on the headband. I started sewing and part way in, had to add more thread to the bobbin. No problem. I'm a pro at this now, didn't even need to consult the machine's manual this time. Rethreaded the machine and it didn't take me two hours. Not a single problem. Until, I got to the automatic needle threader which would not budge. I'm not too proud to break the manual out again, even re-watch the YouTube video on how to work it. Ok, I'm doing this right why won't it move?? Pushed it again, the plastic lever snapped off. So, I threaded the machine needle by hand. Inconvenient because now I had to check the machine's warranty and call Singer the next day, but one monkey don't stop the show.
Finish the headband and it's infantile. By this I mean, if anybody needs a vintage headband for their newborn baby girl, I got you. My first instinct was right, the pieces were way too short. Re-consulted my pattern to see where I could have gone wrong. The only thing I could find was a sentence that asked for the pattern to be placed on the fold of fabric. When I was cutting, it didn't really make sense because the pattern called for two strips of fabric and I thought it'd be neater to just cut two separate pieces. So, I took "fold of fabric" to be interchangeable with "edge of fabric." But after making a teeny, tiny headband, I decided to Google and discovered the technique of folding fabric before you cut it to keep it symmetrical for designs that call for you to fold and sew them later.
This story does have a happy ending though. Luckily, I bought twice as much fabric as the pattern called for, so I was able to make a new headband that night. And I spoke with Singer two days later and they've agreed to ship a replacement piece for the broken threader lever free of charge.
I've already moved on to my next project and am hoping my next 'What's Happening' post will be less lessons learned and more me showing off all my pro sewing skills.
In other news, I finished reading Quiet: The Power of Introverts in a World That Can't Stop Talking. I still think everyone needs to read this, but I do think it's target audience is extroverts that have a desire to better understand introverts and introverts who may not understand or be completely comfortable with their nature. You can read my full review of it here.
 And lastly, I started reading The Red Tent. I'm going to hold off on giving any feedback because this post is already insanely long.
I've gotten word that I should give progress updates on my craft projects, so stand by for that. It'll let me be in touch more, but it'll also keep my 'What's Happening' posts from turning into epic novels lol Also, you can get more updates from me on my Facebook page. Or if you really need to know what's going on with me from moment to moment, I'm @midnytebloom on both Twitter and Instagram.
Until next time,
~With ♥ from Halima
I found a couple of basic patterns on Craftsy and also took the suggestion of a friend and checked out Mimi G. I was really excited about her because she has free, online classes which walk you through patterns.
This led me to my first trip to the fabric store. Where I spent three hours. In my defense, not only did I have no idea what I was doing, but I had to touch all the gadgets I never knew existed.
 |
| Don't mind the three-day old wash-n-go. Was going to do something cute, but was migraining for four days prior to this pic and suddenly it didn't seem so important lol |
The second night started off bad. I sat down with all the confidence in the world, thinking all I had to do was spend a couple of minutes putting the finishing touches on the headband. I started sewing and part way in, had to add more thread to the bobbin. No problem. I'm a pro at this now, didn't even need to consult the machine's manual this time. Rethreaded the machine and it didn't take me two hours. Not a single problem. Until, I got to the automatic needle threader which would not budge. I'm not too proud to break the manual out again, even re-watch the YouTube video on how to work it. Ok, I'm doing this right why won't it move?? Pushed it again, the plastic lever snapped off. So, I threaded the machine needle by hand. Inconvenient because now I had to check the machine's warranty and call Singer the next day, but one monkey don't stop the show.
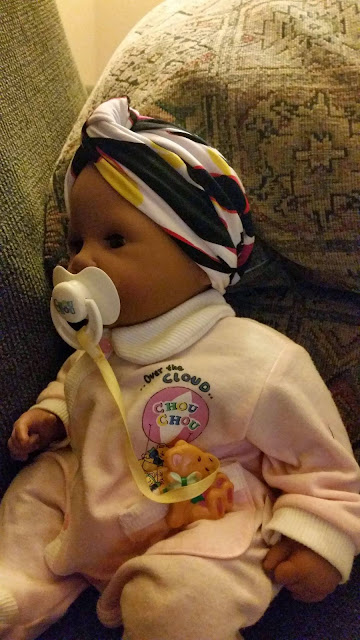 |
| Infant baby turban |
This story does have a happy ending though. Luckily, I bought twice as much fabric as the pattern called for, so I was able to make a new headband that night. And I spoke with Singer two days later and they've agreed to ship a replacement piece for the broken threader lever free of charge.
I've already moved on to my next project and am hoping my next 'What's Happening' post will be less lessons learned and more me showing off all my pro sewing skills.
In other news, I finished reading Quiet: The Power of Introverts in a World That Can't Stop Talking. I still think everyone needs to read this, but I do think it's target audience is extroverts that have a desire to better understand introverts and introverts who may not understand or be completely comfortable with their nature. You can read my full review of it here.
I've gotten word that I should give progress updates on my craft projects, so stand by for that. It'll let me be in touch more, but it'll also keep my 'What's Happening' posts from turning into epic novels lol Also, you can get more updates from me on my Facebook page. Or if you really need to know what's going on with me from moment to moment, I'm @midnytebloom on both Twitter and Instagram.
Until next time,
~With ♥ from Halima
Tag :
Halima's Faves
,
I'm What's Happening
,

